
Since 2006
Welcome to CHINA SINOTRUCK(HK) LIMITED !










How to inspect a flatbed container trailer for frame cracks
A crack in the frame of a flatbed container trailer can grow under repeated loading and compromise the structure that supports the container. A fresh rust line near a weld, damaged paint around a suspension bracket, or an unexplained change in deck alignment should prompt a closer inspection—not another loaded trip.
Inspect the trailer on a secure, level surface, concentrating on load-transfer points and changes in frame section. Clean suspect areas, trace any indication beyond the weld, and record its location and size. Treat a confirmed structural crack, or an indication that cannot be safely ruled out, as a reason to remove the trailer from service until it has been assessed.
Prepare the trailer for a close inspection
Review the trailer manufacturer’s inspection instructions, previous defect records and applicable local roadworthiness requirements before starting. Pay particular attention to previously repaired areas and reports of unusual impacts, overloading or shifting containers. These do not prove that a crack exists, but they help establish where to look first.
Unload the trailer unless the manufacturer specifies otherwise for a particular check. Park on firm, level ground, apply the parking brake and chock the wheels. Isolate equipment that could move unexpectedly. Use appropriate stands or other rated support where required; never rely on a jack, suspension pressure or landing gear alone to protect someone working underneath. Follow the site’s confined-space and lifting procedures where applicable.
Use a strong portable light, inspection mirror, cleaning materials and a suitable measuring tool. A camera and a marked diagram are useful for recording findings. Remove loose dirt, grease and flaking coating from areas that need examination, but do not grind a suspected crack away: that can obscure its original extent and remove material needed for evaluation.
Follow the load path through the frame
Start at the front and work systematically towards the rear, checking both sides and the underside. Look at the parent metal as well as the welds. Fatigue cracks often begin at a weld toe, the end of a bracket or another abrupt change in stiffness; the visible line may then continue into the adjoining beam.
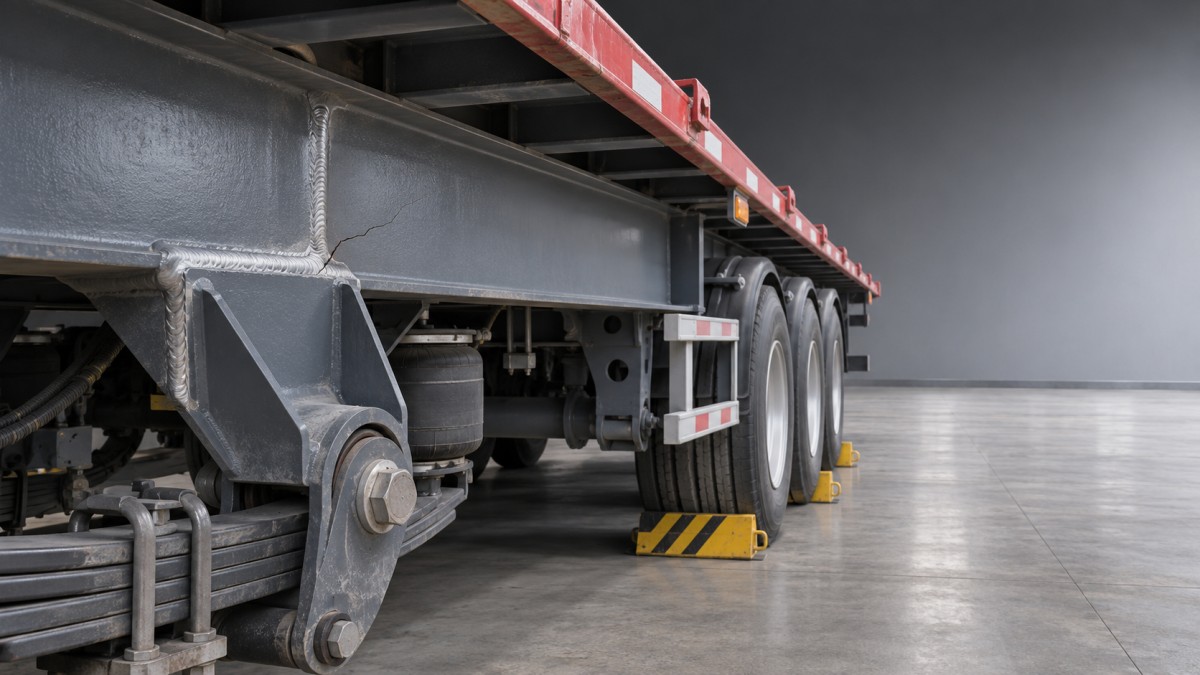
- Kingpin and upper coupling area: Examine the mounting plate, surrounding welds and connections to the main beams. Look for cracking, distorted plate, loose fasteners or evidence of movement.
- Main longitudinal beams: Inspect flanges and webs, particularly at splices, cut-outs, attachment points and changes in section. A crack may be more visible on the underside of a flange than from the side.
- Suspension and axle attachments: Check hanger brackets, spring seats, torque-arm mounts and their surrounding frame material. Rust bleeding from a bracket edge or damaged coating can indicate movement or a developing defect.
- Crossmembers and deck supports: Inspect their connections to the main beams, especially where supports are bent, impact-damaged or separated from the deck structure.
- Container locks and corner supports: Examine the lock housings, mounting plates and nearby welds. A secure-looking lock does not rule out a crack in the structure carrying its load.
- Rear frame and landing-gear mounts: Look around bracket ends, reinforcement plates and weld terminations, as well as areas exposed to manoeuvring impacts.
Compare corresponding locations on both sides, but do not assume that a feature is acceptable simply because it appears symmetrical. Examine any local buckling, permanent bend, missing weld or displaced component as a separate structural concern.
Distinguish a crack from a surface mark
A paint split can reveal movement below the coating, but it can also be a coating defect. Clean the area carefully and inspect it under angled light. A suspected crack may appear as a fine, irregular line crossing the weld toe or continuing into the parent metal. Rust staining along a narrow line can be a clue; the absence of rust does not exclude a fresh crack.
Do not use a hammer strike or force a component to move as an informal proof test. If the indication remains uncertain, arrange an appropriate non-destructive examination. A qualified technician can select a method suited to the material, geometry, surface condition and access. Magnetic particle testing may help reveal surface-breaking indications in suitable ferromagnetic steel; dye penetrant testing requires a clean, accessible surface and may be limited by rough coatings or contamination. Neither method should be treated as a substitute for assessing the wider structure.
Cracks may also be hidden beneath reinforcement plates, decking or attachments. Where damage suggests the visible indication could extend into an inaccessible area, establish a safe inspection plan before removing components. Avoid assuming that the visible length represents the full defect.
Record findings so the repair decision is traceable
Mark the location without damaging the material, photograph it with both a close view and a wider reference view, and record the trailer identification, inspection date and operating condition. Measure the visible indication and describe its direction, the affected member, nearby welds, deformation and any signs of corrosion. Identify whether the area has been repaired before.
Separate observations from conclusions: “a linear indication extends from the bracket weld toe into the beam web” is more useful than “bad weld.” Record measurements as visible lengths, not as the full crack length unless an appropriate examination has established the extent. Make the record available to the person responsible for the service decision and compare it with earlier inspection records.
Decide whether the trailer can return to service
Do not dispatch a trailer with a confirmed crack in a structural load path. Isolate and tag it according to the site procedure. A suspected structural crack that cannot be resolved during the inspection should also be held for assessment. Loose or detached suspension mounts, significant deformation and damaged container support structures require prompt evaluation even when no crack is visible.
Acceptance limits depend on the manufacturer’s requirements, the affected component and applicable jurisdictional rules. Do not invent a universal permissible crack length or assume that a small indication is safe because it has not yet changed the trailer’s alignment. An engineering assessment may need to consider the crack’s full extent, material condition, loading history and the cause of the damage.
Repair should follow an approved procedure appropriate to the trailer and material. Uncontrolled welding, adding a plate over an unidentified crack or drilling a stop hole without an engineered instruction can conceal damage or introduce new stress concentrations. After repair, inspect the work using the specified method, document acceptance and verify that any required alignment or functional checks have been completed before release.
Extend the inspection to the actual equipment configuration
The same load-path approach applies to other trailer designs, but the critical joints are not identical. For example, the Multi-Axle Hydraulic Removable Gooseneck Lowbed Trailer with Lifting Rear Axles is an 80-ton, five-axle lowbed configuration with a removable gooseneck and two lifting axles. Its gooseneck connections, lifting-axle attachments and associated frame supports warrant attention in addition to the main beams. Use the specific manufacturer’s inspection and support instructions rather than transferring flatbed acceptance criteria to those components.
Once a defect has been addressed, use its location to inform future inspections. Repeated cracking at the same bracket or repair may point to an unresolved loading, alignment, impact or structural issue; simply repeating the same weld repair does not establish that the cause has been corrected.
Related Posts
- ▶ Does a lighter flatbed container trailer increase usable payload?
- ▶ How to inspect a flatbed container trailer for frame cracks
- ▶ Is a flatbed container trailer suitable for non-container cargo?
- ▶ What causes uneven tire wear on a flatbed container trailer?
- ▶ When does a flatbed container trailer need a reinforced deck?
- ▶ How to check twist lock alignment on a flatbed container trailer
- ▶ Can a flatbed container trailer carry a 40-foot container?
- ▶ 14m 3-Axle Gooseneck Lowbed Trailer for Nigeria: Meeting Real Heavy Equipment Transport Needs
- ▶ Conquer Africa's Rugged Terrain: 14m 3-Axle Gooseneck Low Bed Trailer, the Ultimate 40-Ton Heavy Machinery Transport Solution
- ▶ Sizing a 60,000L Gooseneck Fuel Tanker for Multi-Stop Station Deliveries
CONTACT US

Established in 2006, CHINA SINOTRUCK(HK) LIMITED Trailer supplies different types of products and provides relevant technical support and services to foreign customers.
Get in Touch
*We respect your confidentiality and all information are protected.